 @zoltandulac
 @zoltandulac
 Zoltan Hawryluk
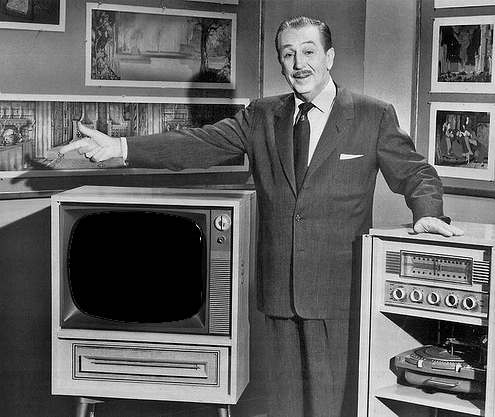


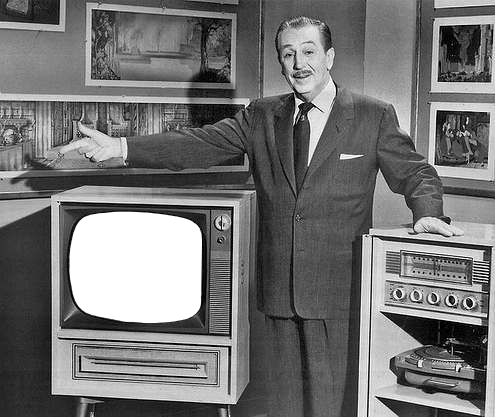
If you click on the TV in the image on the right, you will see that it contains an image gallery (created using the jQuery Cycle Plugin. You may ask “I’ve used this awesome plugin before, so what’s the big deal?” Although this looks deceptively simple, the big deal about this is that the gallery is behind a DOM object and mouse events are bring passed through it. The image of Mr. Disney that you see here is a JPEG with the television screen clipped out. Underneath that clipped area is the image gallery. When you click, hover, or do any other actions with your mouse, these events are passing through the image and are captured by the image gallery. There are a few ways to do this using the CSS pointer-event property and any number of different image formats that supports clipping (e.g. SVG, canvas, PNGs with alpha-transparency). Unfortunately, each one of these clipping technologies has it’s advantages and deal breaking disadvantages. So after quite a bit of research, I came up with a method that is cross-browser (yes, it works in IE7), has been optimized for fast animations in all browsers (not always easy, as we will see later in this article) and works well in mobile.
See a clean-room version of the above example
What Does The pointer-event Property Do?
In HTML documents, setting a DOM object’s pointer-event property to none will result in any mouse event to pass through that object to the DOM object positioned underneath. This goes for both JavaScript events (e.g. click, mouseover, etc.) as well as CSS-related pseudo-class events (e.g. :hover, :active, etc.) The only other value that the pointer-event property can have in the HTML world is visible, which allows the node to capture mouse events again.
Originally, the pointer-event property was meant to be used for SVG, which allows more fine-grained control of mouse events. More information about this can be seen on the Mozilla Developer Network‘s page on SVG pointer-events.
Method #1: SVG
The first method is to use SVG to clip the image. Developers can embed the SVG directly into their HTML markup like this:
<svg xmlns="http://www.w3.org/2000/svg"
   width="495px" height="417px"
   viewBox="0 0 495 417"
   xmlns:xlink="http://www.w3.org/1999/xlink">
<defs>
    <pattern id="disney-embed" patternUnits="userSpaceOnUse"
       width="495" height="417">
          <image xlink:href="/tests/pointerEvents/images/disney-tv.jpg"
          x="0" y="0" width="495" height="417" />
    </pattern>
</defs>

<path id="walt-embed"
      fill="url(#disney-embed)" stroke="none"
      d="M 495.00,0.00
         C 495.00,0.00 495.00,417.00 495.00,417.00
           495.00,417.00 0.00,417.00 0.00,417.00
           0.00,417.00 0.00,0.00 0.00,0.00
           0.00,0.00 495.00,0.00 495.00,0.00 Z
         M 81.18,219.39
         C 75.28,224.66 73.26,233.55 71.61,241.00
           68.81,256.26 68.66,271.70 71.61,287.00
           72.76,294.37 74.47,301.98 79.68,307.70
           85.29,313.85 91.52,314.81 99.00,316.73
           99.00,316.73 126.00,321.96 126.00,321.96
           126.00,321.96 134.00,321.96 134.00,321.96
           134.00,321.96 144.00,323.00 144.00,323.00
           156.04,323.14 168.13,322.58 180.00,320.39
           187.27,319.04 193.58,317.17 198.20,310.91
           202.27,305.40 200.54,300.30 201.28,294.00
           201.28,294.00 202.00,244.00 202.00,244.00
           201.98,234.15 201.61,228.06 192.91,221.85
           187.58,218.04 176.56,216.51 170.00,215.41
           153.07,212.57 126.99,210.70 110.00,212.28
           101.11,213.56 88.05,213.25 81.18,219.39 Z" />
</svg>
Note the two highlighted areas. The image we are masking with is included in a <pattern> tag. The clipping path is included in the <path> tag. Note that the <path> refers to the <pattern> via the <pattern>’s id in the <path>‘s fill attribute.
How do we come up with the path? You can use an SVG tool like Inkscape (which, incidentally, is open-source) or use another vector tool like Adobe Illustrator to do the job. However, for those of you like me who want something cheap and simple, take a look at my companion article How To Create SVG Paths Easily Using The GIMP.
One can also save the SVG block as an .svg file and point to it using an <object> tag, like in the example below.
<object id="object" type="image/svg+xml" data="/tests/pointerEvents/images/tv-path.svg">
   Your browser does not support SVG
</object>
Here is a live example so you can see the result:
The good thing about using SVG is that the it works as expected — pointer-event was originally developed to be an SVG only property. As a result, it passes the clicks through it to the gallery underneath in all browsers … except in IE8 and below (and also in IE9-10 if you embed your SVG with the <object> tag like the example above). You can make it degrade gracefully by putting alternative markup in the <object> tag (Where I put “Your browser does not support SVG”) but that doesn’t help you if you want the end result to look like the example at the beginning of the article. Using the embedded SVG is even worse, as there is not alternative markup for IE7 and 8 to show. Older IE will also show a broken image because, as Lea Verou mentioned in her blog post about standards based text-masking, IE interprets the <image> tag as an HTML <img> tag. Since there is no src, we have the broken image.
There is one last issue with using SVG for this use-case: performance. Firefox will slow down the animations underneath the transparent part of an SVG element. If you take a compare the animation in the SVG example compared to the others in Firefox, you will see a the SVG version drops a few frames. This is true with Firefox 20 and under, which was the current production version at the time of the writing of this article.
Method #2: PNG
Developers can also use their favorite graphics editor to clip out the areas they want transparent and save the result as a PNG. Here is a live example so you can see how this works:
In the above example, I use CSS to set the image’s pointer-event property to none. Click on the gallery using Firefox, Safari and Chrome and this will work as expected. Unfortunately, Opera and IE (including 10) do not support the pointer-event property for HTML nodes, so this is even worse that the SVG solution. Furthermore, PNG files are generally larger than JPGs for photographs, so this solution will not be optimal for really large images.
Method #3: polyClip.js
For more information about polyClip.js, please read my introductory blog post, Clipping JPEG Images Into Non-Rectangular Polygons Using polyClip.js
As I have mentioned on previous blog posts, I have used polyClip.js to take a JPEG image and clip parts out and place the result inside of an HTML5 <canvas> element. Not only does this give you a better download speed than the PNG solution, but it has the added side-effect of letting mouse events through the transparent part of the resultant image in all versions of IE. This is because:
- In IE 7-8, polyClip.js uses the excanvas polyfill to convert HTML5 Canvas API calls to VML. The parts of the <canvas> that aren’t painted with VML allow mouse events through by default.
- In IE9+, polyClip.js will render the clipped image as an SVG. As long as the CSS
pointer-eventproperty is set tononefor all[data-polyclip]selectors, mouse events will pass through.
Here’s how to do the polyClip.js method:
- Grab polyclip.js
Download the latest copy of polyclip.js from github - In the page you want to include the image in, insert the following
<script>tags in your document:
<script src="/path/to/js/jquery-1.9.1.min.js"></script>

<!--[if lt IE 9 ]>
 <script src="/path/to/js/polyClip/js/excanvas/excanvas.compiled.js"></script>
<![endif]-->

<script src="/path/to/js/canvg.js"></script>
<script src="/path/to/js/polyClip/js/polyclip-p.js"
           data-polyclip-clippreference="svg"
           data-polyclip-forcepointerevents="true"></script>
The polyClip.js library requires jQuery in order to run. The excanvas library is included in conditional comments since it is only needed in IE8 and lower — it is used to convert basic HTML5 canvas api calls to VML (more on this later). The final library, canvg.js, is used by polyClip.js to clip out an SVG path from an image.
Note the
data-polyclip-clippreference="svg"anddata-polyclip-forcepointerevents="true"attributes in polyClip.js’s <script> tag. Thedata-polyclip-clippreference="svg"tells polyClip.js to “generate SVG when you can”. Usually, this would always happen in all SVG browsers, but when combined withdata-polyclip-clippreference="svg"it will only render SVG when thepointer-eventCSS property is not supported in HTML (IE9-10 and Opera). Browsers that do support HTMLpointer-events will use Canvas (Firefox, Safari and Chrome), while older IE will use VML. This will ensure the optimum performance for any animations that appear below the clipped image in all browsers. You can use the<body>tag instead of polyClip.js’s <script> tag to set these attributes, in the event you change the name of polyClip.js or incorporate it into a larger, compressed script to optimize load times. - Next, insert the original image into your document, and place the SVG path inside the
<img>tag as below:
<img src="images/disney-tv.jpg"
     data-polyclip-width="495"
     data-polyclip-height="417"
     data-polyclip="path:M 495.00,0.00
       C 495.00,0.00 495.00,417.00 495.00,417.00
         495.00,417.00 0.00,417.00 0.00,417.00
         0.00,417.00 0.00,0.00 0.00,0.00
         0.00,0.00 495.00,0.00 495.00,0.00 Z
       M 81.18,219.39
       C 75.28,224.66 73.26,233.55 71.61,241.00
         68.81,256.26 68.66,271.70 71.61,287.00
         72.76,294.37 74.47,301.98 79.68,307.70
         85.29,313.85 91.52,314.81 99.00,316.73
         99.00,316.73 126.00,321.96 126.00,321.96
         126.00,321.96 134.00,321.96 134.00,321.96
         134.00,321.96 144.00,323.00 144.00,323.00
         156.04,323.14 168.13,322.58 180.00,320.39
         187.27,319.04 193.58,317.17 198.20,310.91
         202.27,305.40 200.54,300.30 201.28,294.00
         201.28,294.00 202.00,244.00 202.00,244.00
         201.98,234.15 201.61,228.06 192.91,221.85
         187.58,218.04 176.56,216.51 170.00,215.41
         153.07,212.57 126.99,210.70 110.00,212.28
         101.11,213.56 88.05,213.25 81.18,219.39 Z"/>
(As mentioned earlier, you can use The GIMP to produce the SVG path easily. For more information, read the companion article How To Create SVG Paths Easily Using The GIMP).
- If you want pointer events to pass through the clipped image that remains, use the following CSS rule.
[data-polyclip] {
    pointer-event: none;
}
See a clean-room version of this method in action.
Are More Complicated Effects Possible?
Remember, all pointer events can pass through the image, including mouseovers, mouseouts and CSS :hover events! This can result in some interesting effects with just a few additional bits of CSS. Here is a great example that could be used for a great landing-page navigational item.
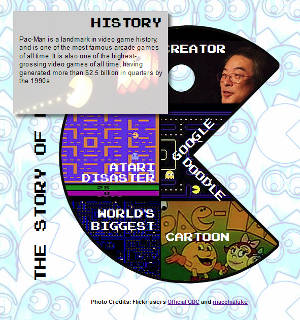
Click on the image above to see a great demo about my favorite video-game of all time, Pac-Man!
Caveats
I have noticed that sometimes, inserting the <script> tags at the end of the body will cause errors in IE8. The workaround is to put them in the <body>.
3 responses so far
1 Frits
// Apr 27, 2013 at 3:55 am
Frits
// Apr 27, 2013 at 3:55 am
I downloaded that polyclip.js file, but the files ‘excanvas.compiled.js’ and ‘canvg.js’ referenced in the code above are not in the package. After lots of searching found out you have to get them separately, but wouldn’t it be better and less confusing if they’d be included in polyclip.js?
2 zoltan
// Apr 29, 2013 at 10:44 pm
zoltan
// Apr 29, 2013 at 10:44 pm
@Frits: Oops … my bad. I thought I checked them into GitHub, but I was mistaken … all the JavaScript libraries you mentioned are now in the polyClip.js repo. Sorry for the inconvenience. (*^_^*);;;;
Give Feedback
Don't be shy! Give feedback and join the discussion.
Please Note: If you are asking for help using the information on this page or if you are reporting a bug with the code featured here, please include a URL that shows the problem you are experiencing along with the browser/version number/operating system combination where the issue manifests itself. Without this information, I may not be able to respond.